
Chris Cloete gives us a step by step on how he uses the CamRanger to streamline his workflow.
Review and photographs by Chris Cloete, a Cape Town & Johannesburg based photographer. The CamRanger Wireless Transmitter for Select Canon and Nikon DSLR Cameras is available on Orms Direct.
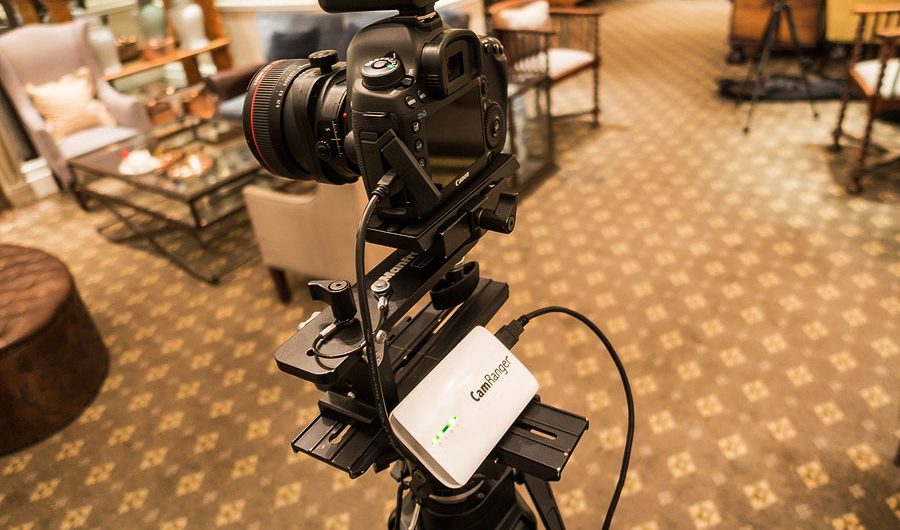
Using the CamRanger
I was first introduced to the CamRanger about 18 months ago and since then I have been using it more and more every day. When I bought it initially, I knew what it was going to do for me and what I needed it for, but it was probably lying around in my bag for about 4 months before I pulled it out one day and actually just got stuck into it.
Setup was relatively easy after unboxing and charging, then a couple of clicks to get the gear on your devices (Mac, iPad and iPhone) registered and off you go. There is of course a full manual if you are that type of person, but it is very intuitive to use – well for my use in any case.
So I am just going to take you through a typical shoot. In this case we will be at the Cape Grace Hotel in Cape Town, an amazing client with whom I started working last year as they needed to go through the process of getting all their imagery redone. We still have quite a few projects with them to do before their website will have the same standard photos throughout.
So let’s get into it.
Plan the shoot
I do a site visit and establish with the client when the best time would be to do the shoot. Both for them operationally and for me to get the best light, least possible interference and what fits into their brief and brand positioning.

I take some reference photos, print them out and then the planning starts by making notes on the print. When you do a shoot, like in this case at 3h30 in the morning, and you haven’t had enough coffee in by the time you need to start shooting, then the notes come in handy. Also, if something goes wrong and you are pressed for time and everyone is having a bad day at the office, then this is your step-by-step plan. You won’t miss the shot and try to Photoshop (don’t you just love that word??) everything to be realistic for what you missed on site.
Equipment
Well I always over pack. That is who I am and I hate being on site and don’t have this lens and that lens. Even though it wasn’t in the planning, you sometimes see something and just wished you had that focal length with you!
But on my critical list was the following:
CamRanger
Canon 5D MKIII
Canon 17mm Tilt-Shift
Canon 1,4 converter (for getting to 24MM)
External Flash and radio trigger
iPad
Manfrotto 058 Tripod and panohead
Setup
I arrive on site. Look the part. Take out everything and only use the bare minimum. Just kidding. I like to keep it tidy when I am on site. Besides that you work in a 5 star hotel like this, it is also easier to keep track of your equipment and nobody, including yourself, will trip over it.
Tripod first, then camera/lens, connect CamRanger to camera, switch on, connect to iPad/iPhone and you ready to go. No creating folders, laptops, etc. One quite important setting I do on my Canon is to set to RAW plus smaller JPEG setting. What essentially happens then is that your JPEG gets transmitted to your device quite quickly instead of trying to transfer a 30MB RAW file all the time. This, especially with my type of workflow, becomes quite critical later on when even the camera tries to keep up with writing to the memory card.

So next up is to switch to LIVE view on the CamRanger. Here you can set your focus, in my case I have to manual focus for tilt-shift lenses. Once I am happy with the focus, I get my base exposure. This will be the exposure I work from throughout the whole session.
I then go around and start lighting up all the different elements like table corners, chairs, sofas, paintings, pillars, etc. So for every angle there is a photo. Some old school and other folks might at this point say, “but why don’t you bring in studio lighting?”. Well easy, in this case it just doesn’t work. The room is too big to hide all that lighting, there is too many little corners that needs detail. It will take too long and quite often nowadays the client don’t have the budget for you to go waste R10 000 for the evening on extra gear rental.
This time-lapse video show’s how I light the room.
Also, I like working alone, as I can concentrate better. This is where the CamRanger comes in beautifully. I don’t have to think for an assistant, or think what I want him/her to change. Make no mistake, the best assistants are great, but it’s just not my sort of thing. At the price for this little device, it has definitely saved me a lot of labour costs. I want to rather use my time to communicate with my client than an assistant and the CamRanger is a very quiet assistant that never talks back.
So then I go round flashing all the nooks and crannies and all the while I can see what is in my viewfinder and if I lit it correctly. Keep referencing back to the list you made and work consistently. After the shoot, everything goes into Lightroom, do basic adjustments on it, export to JPEG, stack all in Photoshop and let the selections begin…


Pros and Cons of the CamRanger for my use:
What I like:
- Battery life is good when you don’t need LIVE view all the time which I don’t need.
- No messy cables.
- See almost in real time what I am doing and make adjustments on the fly.
- Save on labour costs.
- Fits into neat little pouch which hangs neatly on tripod when in use.
- Value for money.
What I don’t like so much:
- It can get a bit slow when you really work fast. Sometimes the app will freeze but it is very quick to restart and connects very quickly.
- The pouch that comes with it is just to small for my liking. It just doesn’t have that extra bit of space for spare battery and cable.


Nice one Chris! You’re getting all fancy like the Atticfire boys. 😀
Hahahahah Seagrim, something like that. Must check if they still around 😉
Very cool Chris.
I assume you use a speedlight for the “flashing all the nooks and crannies” – do you use an umbrella / softbox or just the bare head?
Thanks Quintin. This time I just used the bare edge with CTO gel, but depending on look/feel you will use different modifiers