
A quick step-by-step guide on how to shoot and create action sequences in Photoshop, by Andre Bezuidenhout.
Avid skateboarder and Orms team member, Andre Bezuidenhout shows us to shoot and edit a great looking action sequence. Andre also gives a few handy tips and leads us through the process from start to finish.
Take pictures / video
First you will need to take a sequence of pictures, or a video, of a subject in action.
- Frame your picture:
Think of how your subject will be moving, if you don’t want to capture a panorama your background has to be more or less the same in each shot. You also do not want a shot where your subject is moving directly to or away from your camera, since your subject might move out of focus, rather shoot at an angle, or in a way that your subject only moves horizontally and or vertically across the frame. - Set exposure settings and focus:
Set your camera/flash exposure and focus your lens that your subject will remain in focus in all the pictures. You do not want your lens to focus and/or your camera to change your exposure settings, to prevent that simply hold the exposure/focus lock button, if you don’t have one simply set your camera to manual focus and manual exposure.
Tips and tricks:
During strong light your subject might move to fast for your flash to reload, using a reflector is highly recommended. Take note of possible shadows that might appear from using a flash/reflector. It’s always a good idea to do a few test shots first.
Using a tripod is great, but by holding your camera steady enough you can fix all background movements except blur.
Editing
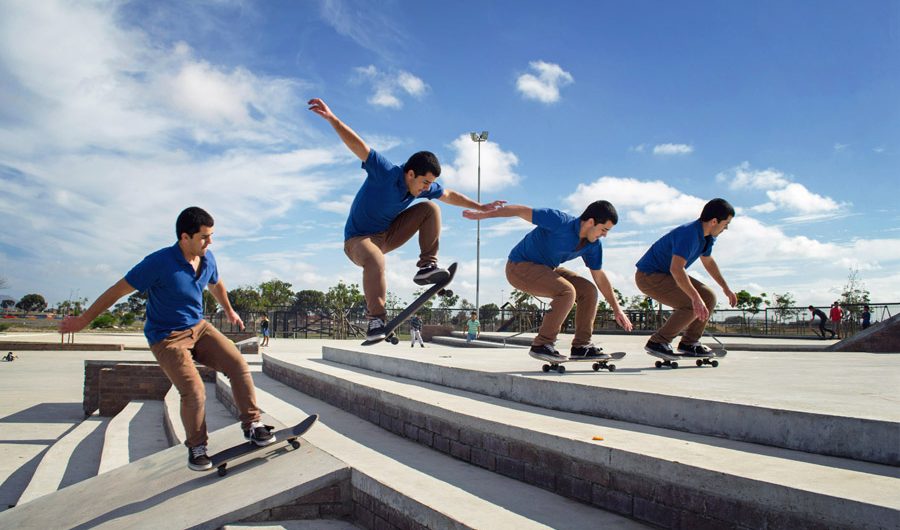
Once you’ve taken your images or recorded your video you are ready to edit. We will go through the steps using Photoshop CS3 and higher. Your selection of images should look something like this.


Edit your pictures if necessary and save your images as tiff, jpg or any other supported file type. If it is a video, simply take screenshots/snapshots from a video player, this is possible in free video players such as VLC.
1. Create a panorama
After editing your pictures open the panorama Photomerge utility: File > automate > Photomerge

- Select the photos that you wish to “merge”
- Select “Reposition” if your background have little to no movement, otherwise select “Auto”.
- Make sure “Blend Images Together” is NOT ticked and click OK.
- The application will now align all the images and arrange them as layers.
- Arrange the layers according to your subject movement.

2. Make a selection
- Select the layer which represents the second action in your sequence and hide all other layers. You will now have to select your subject by brushing in mask mode.
- To mask in Photoshop simply click on the “Edit in Quick Mask Mode” button, select a brush, and brush over the subject.

- Exit quick masking mode after brushing. You will now have a selection of everything you did not brush.
- While keeping your selection, take a large eraser and erase the whole background around the subject.
- Invert your selection by click on “invert selection” in the “Select” menu.
3. Erase first layer background
- Select and display the first layer and erase everything within your selection. If done correctly your selected subject will now appear on the first layer. If you are satisfied with the selection you can merge the 2 layers (by right clicking on the top layer and selecting merge down).


Repeat if needed and save.

And there you go, the end result should look something like this.


