Learn how to make use of the pen tool, adjustment layers and layer masks with Adobe Photoshop.
Hey everyone. Over the last two weeks we’ve shared some advice on how to get the best from your DSLR and how to optimise your digital workflow. Today we’ll be sharing some tips for Adobe Photoshop. This isn’t a tutorial for any specific project, just some advice on which tools you should make use of if you don’t already. If you are looking for tutorials, check out Gomediazine.
The pen tool is your best friend
In my personal opinion, the pen tool is one of the most important features of Photoshop. It’s one of the reasons why you use an advanced application like Photoshop, instead of the more basic editing packages. Why do I rate it so highly? It allows you to make extremely accurate masks – the second most important feature of layer based software such as Photoshop.
The pen tool can be daunting for new users. If you find yourself reading this and asking: “What is the pen tool?” – then this is for you. Despite it’s name, the pen tool isn’t a tool that mimics a real pen like the brush tool mimics a real brush (you don’t click and drag to draw a line). It also has nothing to do with the pens you get with graphics tablets (the pen tool is actually easier to use with a mouse than it is with a tablet). The pen tool is one of the few vector based tools in Photoshop, which means it uses maths to determine it’s shape, not pixels.
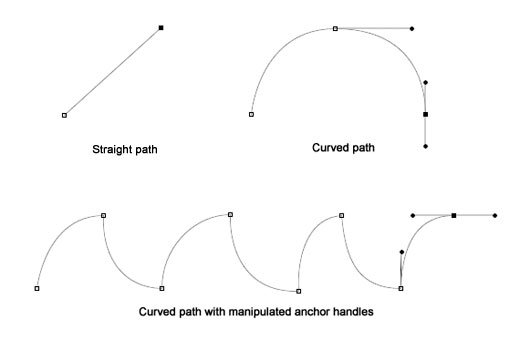
Here’s how it works: You can select the pen tool from the tool selection palette, or by pressing P. You can then click anywhere to drop an “anchor point”, such as on the edge of the subject you are trying to mask out from the background. After you’ve dropped your first anchor point, you can drop another one elsewhere on the edge of the subject. If you just click normally, you’ll notice Photoshop has created a straight line between the two anchor points. This is called the “path”. While a path can consist of straight lines between anchor points, the real power of the tool lies in the ability to manipulate these straight lines into curves. Going back to the stage where you just had one anchor point, click to drop a second one again, but this time hold down the mouse button while dragging the cursor into any direction. This will create the “handles” of the anchor point. You’ll see that the straight line now becomes a curve, and if you keep creating new anchor points and dragging out handles, your path will be a long curvy line.
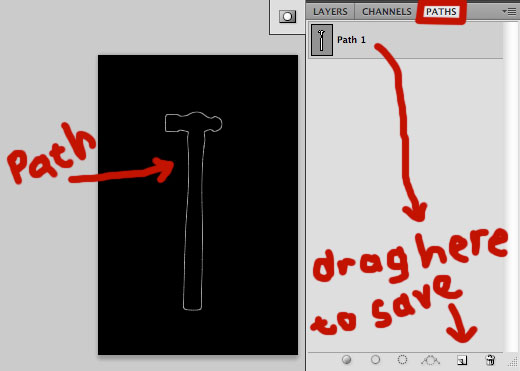
Notice how handy this can be to make custom selections? Think about bunched up fabric, such as a jersey sleeve, or the curves of the hammer above. By using the pen tool you can create a custom selection that fits the rolls of fabric or the shape of any object. To have more control over the shape of the curve, you can hold down Alt on your keyboard to manipulate the handles on the anchors. Once you have completed your path, you should save it by going to the Paths palette (next to the Layers palette) and dragging the “work path” to the new path button at the bottom. Then you can turn the path into a selection by right clicking on the image and selecting “Create new selection.”
If none of that made any sense, don’t worry about it. The only way to truly learn how Photoshop tools work is to experiment with them. Don’t even bother with a tutorial for now, just launch a new blank document and start playing around with the pen tool. See how the curve adjusts, how far you need to drag out the handles, and how you can manipulate them using the Alt key. After you get the hang of it, practice it on one of your own pictures. It’s one thing to understand the pen tool, but another to use if efficiently. The most important thing is to keep practicing. It took me about a year to control the pen tool like it’s my second nature, and it has become a crucial part of my workflow. Once you’ve got the hang of it, it will be crucial to you as well.
Due to its flexible and editable nature, the pen tool is primarily used to make custom selections for layer masks, which brings us to our second point.
Make use of layer masks for non-destructive editing
Okay, so maybe layer masks and non-destructive editing is more important than the pen tool, but I had to get the pen tool’s usefulness off my chest. So what is non-destructive editing, you ask? It’s essentially similar to RAW files and their adjustments – with a non-destructive Photoshop edit, you never touch the original file (the Background layer). You use layers on top of the original to adjust the image, cleverly called adjustment layers. Want to tweak the contrast by changing the levels? Don’t hit Cmd/Ctrl-L, rather click on “new adjustment layer” at the bottom of the layers palette. This allows you to get the same result without hard-editing the changes into the pixels of the original image. If you make some other changes and decide you don’t like the first levels adjustment, you simply delete the layer you created.
With layer masks, this becomes even more powerful. Say you only want to have the levels adjustment affect the left side of the image, you can use a large, soft black brush to paint the right side of the layer mask. Black areas on the layer mask essentially cancel out its effect on the layers below. And this is where the pen tool comes in again. Say you want to darken the background of a portrait, you can use a curves adjustment layer and a layer mask. Sure, you can brush out the subject with a black brush, but the edges will create a ‘halo’ effect as the background transitions to the darker version. By using the pen tool and making an exact selection of your subject, the effect looks more realistic. That’s just one example of non-destructive, effective use of adjustment layers and the pen tool.
It seems like we’ve run out of space for more Photoshop tips in today’s post, but the two tips above are fundamental essentials for anyone interested in getting the most from their edits. I’ll do a follow up post at some point with more tips. Let us know if you have any questions in the comments, we’re more than happy to answer any queries!
Thanks to Moolman de la Harpe for the use of his hammer image.
PS. Apologies for missing Monday’s post on speedlights. We were very busy prepping some other work, but normal scheduling will resume from today onwards.


Thank you!