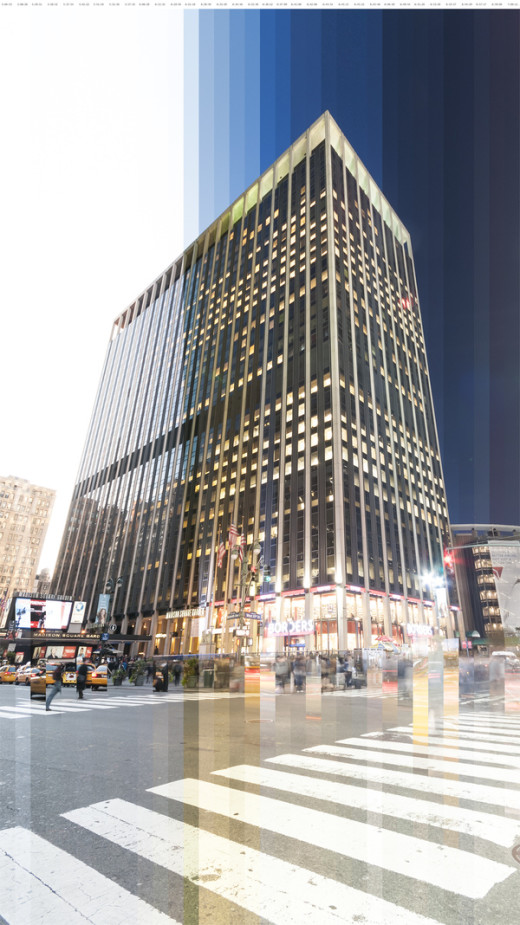
Here’s a quick technique anyone can try for themselves, time-slice photography. Great example photographs by Richard Silver.
Here’s an interesting new technique for those that enjoy experimenting with photography: time-slice photos.
The images below were taken by American photographer Richard Silver, who pointed his camera at New York architecture for an hour or two during sunset. The results are fascinating, and can be accomplished using very little equipment and post-production effort.
Step 1. Simply place your camera on a tripod or steady surface, aim it at your subject, and shoot multiple images during sunset or sunrise – the trick is to capture your photographs during changeable lighting conditions, otherwise you would spend hours shooting very similar lighting conditions.
Step 2. Choose how many photos you’d like to include in your time-slice, for example 20, and then work out how often you need to take a picture. You won’t necessarily need an intervalometer controller, but a remote cable release (we have Jianisi remotes on special) and a watch would be very useful. You might need to experiment with exposure settings, but “Auto” should work well.
Step 3. The final step would be to combine all the images in one file in Photoshop (or similar software) and mask out each slice of time. Let us know in the comments if you’d like to know more – We can ask our Photoshop tutorial master, Manfred Werner, to explain the masking techniques in a short video clip.
Finally, have fun experimenting and be sure to let us know how it goes!
Via PhotographyServed. For more of Richard Silver’s photos, view his Behance profile.
Photos shared under the Creative Commons license.


This is a great idea but I think it would work better with landscape photos for more contrast from the right side to the left. It is reasonably self explanatory but a video would still be appreciated 🙂
A very interesting idea, but I still prefer using multiple photos like these in a time lapse video instead.
I tried this, but it is a bit of a pain to manually crop photos and stitch them together (I use Lightroom). A video tutorial on how this is done in photoshop would be appreciated! But only if there’s an easier way of doing it…
Can you please explain how to mask out each photograph? Thank you
Look up masking with photoshop